


Quick install
Most add-ons mount in under 30 minutes with a drill and wrench — no proprietary brackets.
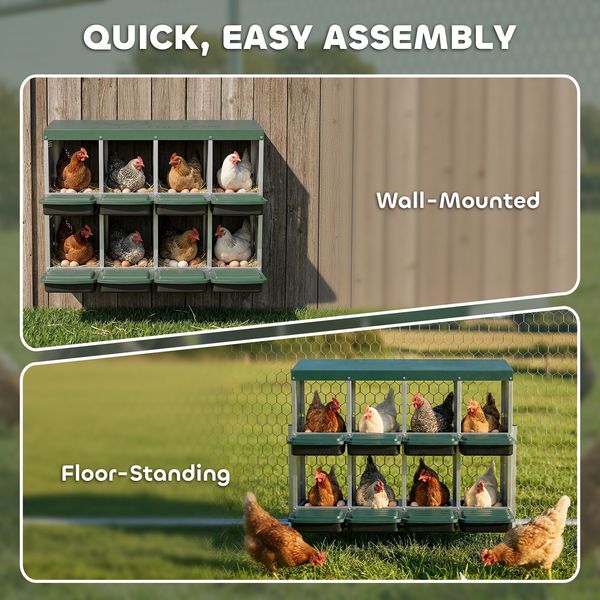
The Brood is the chicken coop accessory for buyers who want galvanized 8-compartment nest setup for 16-32 hens. It is built around larger flocks that need cleaner egg collection and fewer nest conflicts, with sizing and support details made clear before you add to cart.
Couldn't load pickup availability
Brood is a focused coop upgrade for larger flocks that need cleaner egg collection and fewer nest conflicts. It solves one daily friction point inside the flock routine, with install, fit, and return expectations stated before you order.
Galvanized 8-compartment nest setup for 16-32 hens. Planned around 16-32 hens and a 8-compartment two-tier nesting box footprint.
| Best fit: | larger flocks that need cleaner egg collection and fewer nest conflicts |
|---|---|
| Capacity: | 16-32 hens |
| Footprint: | 8-compartment two-tier nesting box |
| Height / profile: | wall mount or stand |
| Primary material: | galvanized steel |
| Assembly: | 30-60 min |
| Shipping: | Small-parcel US shipping, usually 3-7 business days. |
| Warranty: | 12-month warranty on frame and hardware |
This accessory is not a coop capacity upgrade by itself. It improves the daily workflow around an existing coop setup, so fit and mounting surface matter more than flock count.
Brood should be installed where you can inspect it easily during normal feeding or egg collection. Check fasteners after the first week, then seasonally after heavy weather or bedding cleanouts.
Plan for 30-60 min before moving birds in. Small-parcel US shipping, usually 3-7 business days. We recommend checking box contents before assembly and contacting support with photos if any part arrives damaged.
Brood fits many standard backyard setups, but you should measure the mounting area and compare it with the product photos before drilling.
Confirm panel thickness, door swing or cord routing, and access to a dry mounting surface. Pre-drill wood frames to avoid splits.
Yes, unused product in original packaging is eligible during the 30-day return window.
Picking the right chicken coop accessory comes down to four checks every keeper should make before ordering: flock size today and in 12 months, predator pressure in your area, assembly time you can realistically commit, and climate exposure.
Most backyard coops, yes — including wooden hen houses, metal walk-in runs, and DIY builds. If you are unsure, send a photo of your coop to support before ordering and we will confirm the fit.
Built for normal outdoor exposure (rain, sun, snow). Avoid direct submersion, extreme heat sources, or salt spray. Keep electrical accessories above ground splash level.
Only if the model requires hardwired power. Battery and plug-in models install in 30 minutes with a cordless drill and basic screws.
Each accessory removes one daily chore from your routine or one risk from the flock — auto-door means no more dusk panic, the heater means no winter losses to cold, the nesting box means scaled egg collection without rebuilding the coop.
Yes — universal mounting brackets are designed for both. Wooden frames accept standard wood screws; metal frames use the included self-tapping screws.
Absolutely — see all chicken coop accessories for the full line. Common bundles: auto-door + heater for winter-ready setups; auto-door + nesting box for hands-free egg collection.
Looking for a quick comparison? See our best chicken coops hero collection, or browse all chicken coops for sale in the catalog. Ships from our US warehouse with free shipping on most orders. US-based support if you have a question before or after assembly.
See product images and the Body content for full technical specifications, dimensions, power draw, and operating ranges.
Designed for backyard chicken coops in the 2-15 hen range. Works with both wood and metal coop walls. Reach out to support if you are unsure whether it fits your existing setup.
Mounts to the inside or outside of the coop depending on the product. Typical install: under 30 minutes with a cordless drill and basic screws. Full instructions and a printable QR code link are included in the box.
Ships single-box parcel from our US warehouse. Transit 2-5 business days. Tracking provided at dispatch.
30-day returns on unused and undamaged product. 1-year warranty on parts and operation. Email support for install questions and replacement parts.


Match the accessory to your weakest point — predator gaps, doors, heat, or daily chores.

Most accessories clamp or screw to standard wood framing. Measure panel thickness before ordering.
Mount when wood is dry. Pre-drill hardwood to avoid splits.
Automatic doors and reinforced latches deliver more safety per dollar than cosmetic add-ons.
Quick wins for safety and convenience without a full rebuild.

Most add-ons mount in under 30 minutes with a drill and wrench — no proprietary brackets.
Fix the weak point — doors, heat, lighting, or predator gaps — without replacing the whole coop.
Designed for standard wood and metal backyard coops, not a single proprietary model.
A few minutes after install prevents loose mounts and weather damage.
Typical install: under 30 minutes. Re-check mounts after the first heavy rain.
Most accessories mount with the same hex screws you used to build the coop. No special tools, no proprietary hardware, no all-day install. Three steps and you are running.
Open the box, check off the included hardware against the manifest, and confirm no shipping damage. Lay out parts on a flat surface near the install site.
Hold the unit against the coop wall (auto-door, nesting box) or place inside (heater). Mark screw holes, pre-drill, then drive the included hex screws.
Connect power (battery or 110V outlet) or load bedding (nesting box). Confirm the first operating cycle works, then leave it to settle for 24 hours.
Most accessories fit standard wood and metal backyard coops. Check panel thickness and frame width in specs.
Usually a cordless drill and wrench set. Pre-drill hardwood to avoid splits.
Yes — 30-day returns on unused product in original packaging.
Drilling mounting holes is normal and does not void our coop frame warranty when installed per instructions.


